Build multi-architecture container images with OpenShift, Buildah and Tekton on AWS
In 2022, I wrote an article on this subject named “Build multi-architecture container images with Kubernetes, Buildah, Tekton and Qemu”. The article described the configuration I had set up for my personal projects. It even went beyond its initial purpose as it has also been used by several colleagues at Red Hat who had the same need. While the configuration described in this previous article is still relevant, the approach is somewhat dated. With the increasing availability of ARM servers in the Cloud, I revisited the topic of building multi-architecture container images using the AWS cloud.
Use Cases
In this article, I explore the construction of multi-architecture container images through three use cases:
- Building an image from a Dockerfile / Containerfile. A multi-architecture base image is available in a registry, and the Dockerfile / Containerfile applies a series of modifications to this image. The resulting image is also multi-architecture.
- Building a NodeJS application.
A NodeJS application is built (
npm installits dependencies, but it can be more complex). The built application is installed via a Containerfile on a multi-architecture base image. The resulting image is also multi-architecture. - Building a Quarkus application.
A Quarkus application is built (using the
mvn packagecommand). The built application is installed via a Containerfile on a multi-architecture base image. The resulting image is also multi-architecture.
To demonstrate the feasibility of building multi-architecture container images, I build container images for x86_64 and arm64 architectures. However, the approach is generalizable to any architecture supported by OpenShift.
The code illustrating these three use cases and their associated Tekton pipelines are in this Git repository.
Overview
To implement these three use cases, I will set up:
- An OpenShift cluster composed of x86_64 and arm64 Compute nodes.
- A Tekton pipeline orchestrating the image builds on these two nodes and combining the resulting images into a manifest that is then pushed to the quay.io registry.
- The EFS persistent storage to store the source code, artifacts, and container images before they are sent to the quay.io registry.
While the previous article targeted vanilla Kubernetes platforms, in this one I focus on OpenShift. I will also use OpenShift Pipelines, Red Hat’s distribution of Tekton, rather than the upstream Tekton.
In the Tekton pipelines, I use Buildah to build and push the container images to the registry.

Deployment of OpenShift on AWS in Multi-Architecture Mode
Installation Procedure
In the rest of this article, I deploy OpenShift 4.15 on AWS, but the approach remains substantially the same in other cloud environments (Azure, GCP, etc.) I am starting with an AWS environment already prepared for OpenShift.
To limit costs, I deploy an OpenShift cluster composed of the bare minimum:
- 1 x86_64 Control Plane node
- 1 x86_64 Compute node
- 1 arm64 Compute node
In the OpenShift 4.15 documentation, the tested ARM64 machines are:
- c6g.* with a cost of $0.0405 to $2.592 per hour (compute optimized)
- m6g.* with a cost of $0.045 to $2.88 per hour (general purpose)
Finally, I chose the following machine types:
- m5a.2xlarge for the Control Plane node and the x86_64 Compute node
- m6g.2xlarge for the arm64 Compute node
The installation procedure is as follows:
- Deployment of a Single Node (SNO) OpenShift cluster to have the Control Plane node
- Addition of the x86_64 Compute node afterwards
- Addition of the arm64 Compute node afterwards
I detail the key points of this installation but make sure to thoroughly read the OpenShift 4.15 documentation before proceeding!
Prerequisites
Installing a multi-architecture cluster requires a specific version of the openshift-install CLI.
Download the multi-architecture version of the OpenShift CLI.
curl -sfL https://mirror.openshift.com/pub/openshift-v4/multi/clients/ocp/4.15.1/amd64/openshift-install-linux.tar.gz | sudo tar -zx -C /usr/local/bin openshift-install
curl -sfL https://mirror.openshift.com/pub/openshift-v4/multi/clients/ocp/4.15.1/amd64/openshift-client-linux-4.15.1.tar.gz | sudo tar -zx -C /usr/local/bin oc kubectl
Creating the Control Plane node
Create the install-config.yaml file. The highlighted areas are the important points of the file.
additionalTrustBundlePolicy: Proxyonly
apiVersion: v1
baseDomain: aws.itix.cloud
compute:
- architecture: amd64
  hyperthreading: Enabled
  name: worker
  platform:
    aws:
      type: m5a.2xlarge
      zones:
      - eu-west-3a
      - eu-west-3b
      - eu-west-3c
  replicas: 0
controlPlane:
  architecture: amd64
  hyperthreading: Enabled
  name: master
  platform:
    aws:
      rootVolume:
        iops: 4000
        size: 500
        type: io1
      type: m5a.2xlarge
      zones:
      - eu-west-3c
  replicas: 1
metadata:
  creationTimestamp: null
  name: build-multiarch
networking:
  clusterNetwork:
  - cidr: 10.128.0.0/14
    hostPrefix: 23
  machineNetwork:
  - cidr: 10.0.0.0/16
  networkType: OVNKubernetes
  serviceNetwork:
  - 172.30.0.0/16
platform:
  aws:
    region: eu-west-3
publish: External
pullSecret: 'REDACTED'
sshKey: |
    REDACTED
I chose to keep the declaration of the Compute nodes but with replicas set to 0 because this simplifies the instantiation of the x86_64 Compute node later on.
Generate the installation manifests.
openshift-install create manifests --dir .
As the OpenShift 4.15 documentation states that the Cluster Samples Operator is not compatible with multi-architecture installations, we need to disable it via the cluster capabilities.
Edit the manifests/cvo-overrides.yaml file and add the additionalEnabledCapabilities section. Do not copy and paste the entire file below because the clusterID is specific to your installation!
apiVersion: config.openshift.io/v1
kind: ClusterVersion
metadata:
  namespace: openshift-cluster-version
  name: version
spec:
  channel: stable-4.15
  clusterID: REDACTED
  baselineCapabilitySet: None
  additionalEnabledCapabilities:
  - marketplace
  - MachineAPI
  - Console
  - Insights
  - Storage
  - CSISnapshot
  - NodeTuning
  - ImageRegistry
  - OperatorLifecycleManager
  - Build
  - DeploymentConfig
Start the cluster installation on AWS.
openshift-install create cluster --dir . --log-level=info
If all goes well, about thirty minutes later you should have something like this:
INFO Consuming Common Manifests from target directory
INFO Consuming Master Machines from target directory
INFO Consuming Openshift Manifests from target directory
INFO Consuming Worker Machines from target directory
INFO Consuming OpenShift Install (Manifests) from target directory
INFO Credentials loaded from the "default" profile in file "/home/nmasse/.aws/credentials"
INFO Creating infrastructure resources...
INFO Waiting up to 20m0s (until 1:15PM CET) for the Kubernetes API at https://api.build-multiarch.aws.itix.cloud:6443...
INFO API v1.28.6+6216ea1 up
INFO Waiting up to 30m0s (until 1:28PM CET) for bootstrapping to complete...
INFO Destroying the bootstrap resources...
INFO Waiting up to 40m0s (until 1:52PM CET) for the cluster at https://api.build-multiarch.aws.itix.cloud:6443 to initialize...
INFO Waiting up to 30m0s (until 1:50PM CET) to ensure each cluster operator has finished progressing...
INFO All cluster operators have completed progressing
INFO Checking to see if there is a route at openshift-console/console...
INFO Install complete!
INFO To access the cluster as the system:admin user when using 'oc', run 'export KUBECONFIG=./auth/kubeconfig'
INFO Access the OpenShift web-console here: https://console-openshift-console.apps.build-multiarch.aws.itix.cloud
INFO Login to the console with user: "kubeadmin", and password: "REDACTED"
INFO Time elapsed: 30m21s
Set the variable KUBECONFIG to connect to the cluster.
export KUBECONFIG=$PWD/auth/kubeconfig
Adding the x86_64 Compute Node
Since the install-config.yaml file included the definition of the Compute nodes but with replicas set to 0, the MachineSets have been generated and are almost ready to use.
$ oc -n openshift-machine-api get MachineSet
NAME                                      DESIRED   CURRENT   READY   AVAILABLE   AGE
build-multiarch-tw9w9-worker-eu-west-3a   0         0                             67m
build-multiarch-tw9w9-worker-eu-west-3b   0         0                             67m
build-multiarch-tw9w9-worker-eu-west-3c   0         0                             67m
Add the label node-role.kubernetes.io/worker to the Compute nodes to be created.
for name in $(oc -n openshift-machine-api get MachineSet -o name); do
  oc -n openshift-machine-api patch "$name" --type=json -p '[{"op":"add","path":"/spec/template/spec/metadata/labels","value":{"node-role.kubernetes.io/worker":""}}]'
done
Add a Compute node in the eu-west-3a zone.
oc -n openshift-machine-api scale machineset build-multiarch-tw9w9-worker-eu-west-3a --replicas=1
Adding the arm64 Compute Node
The OpenShift 4.15 documentation lists the checks to be performed before being able to add a node of another architecture to the cluster.
$ oc adm release info -o jsonpath="{ .metadata.metadata}"
{"release.openshift.io/architecture":"multi","url":"https://access.redhat.com/errata/RHSA-2024:1210"}

$ oc get configmap/coreos-bootimages -n openshift-machine-config-operator -o jsonpath='{.data.stream}' | jq -r '.architectures.aarch64.images.aws.regions."eu-west-3".image'
ami-0eab6a7956a66deda
Add the ARM64 MachineSet to the cluster. Here the ARM64 architecture is called “aarch64”.
ARCH="aarch64" # x86_64 or aarch64
AWS_REGION="eu-west-3"
AWS_AZ=("a" "b" "c")
AWS_INSTANCE_TYPE="m6g.2xlarge" # Must match $ARCH!
AMI_ID="$(oc get configmap/coreos-bootimages -n openshift-machine-config-operator -o jsonpath='{.data.stream}' | jq -r ".architectures.$ARCH.images.aws.regions.\"$AWS_REGION\".image")"
INFRASTRUCTURE_NAME="$(oc get -o jsonpath='{.status.infrastructureName}' infrastructure cluster)"

for az in "${AWS_AZ[@]}"; do
  oc apply -f - <<EOF
apiVersion: machine.openshift.io/v1beta1
kind: MachineSet
metadata:
  name: $INFRASTRUCTURE_NAME-$ARCH-worker-$AWS_REGION$az
  namespace: openshift-machine-api
  labels:
    machine.openshift.io/cluster-api-cluster: $INFRASTRUCTURE_NAME
spec:
  replicas: 0
  selector:
    matchLabels:
      machine.openshift.io/cluster-api-cluster: $INFRASTRUCTURE_NAME
      machine.openshift.io/cluster-api-machineset: $INFRASTRUCTURE_NAME-$ARCH-worker-$AWS_REGION$az
  template:
    metadata:
      labels:
        machine.openshift.io/cluster-api-cluster: $INFRASTRUCTURE_NAME
        machine.openshift.io/cluster-api-machine-role: worker
        machine.openshift.io/cluster-api-machine-type: worker
        machine.openshift.io/cluster-api-machineset: $INFRASTRUCTURE_NAME-$ARCH-worker-$AWS_REGION$az
    spec:
      lifecycleHooks: {}
      metadata:
        labels:
          node-role.kubernetes.io/worker: ''
      providerSpec:
        value:
          userDataSecret:
            name: worker-user-data
          placement:
            availabilityZone: $AWS_REGION$az
            region: $AWS_REGION
          credentialsSecret:
            name: aws-cloud-credentials
          instanceType: $AWS_INSTANCE_TYPE
          metadata:
            creationTimestamp: null
          blockDevices:
            - ebs:
                encrypted: true
                iops: 0
                kmsKey:
                  arn: ''
                volumeSize: 120
                volumeType: gp3
          securityGroups:
            - filters:
                - name: 'tag:Name'
                  values:
                    - $INFRASTRUCTURE_NAME-worker-sg
          kind: AWSMachineProviderConfig
          metadataServiceOptions: {}
          tags:
            - name: kubernetes.io/cluster/$INFRASTRUCTURE_NAME
              value: owned
          deviceIndex: 0
          ami:
            id: $AMI_ID
          subnet:
            filters:
              - name: 'tag:Name'
                values:
                  - $INFRASTRUCTURE_NAME-private-$AWS_REGION$az
          apiVersion: machine.openshift.io/v1beta1
          iamInstanceProfile:
            id: $INFRASTRUCTURE_NAME-worker-profile
EOF
done
Add a Compute node arm64 in the eu-west-3b zone.
oc -n openshift-machine-api scale machineset build-multiarch-tw9w9-aarch64-worker-eu-west-3b --replicas=1
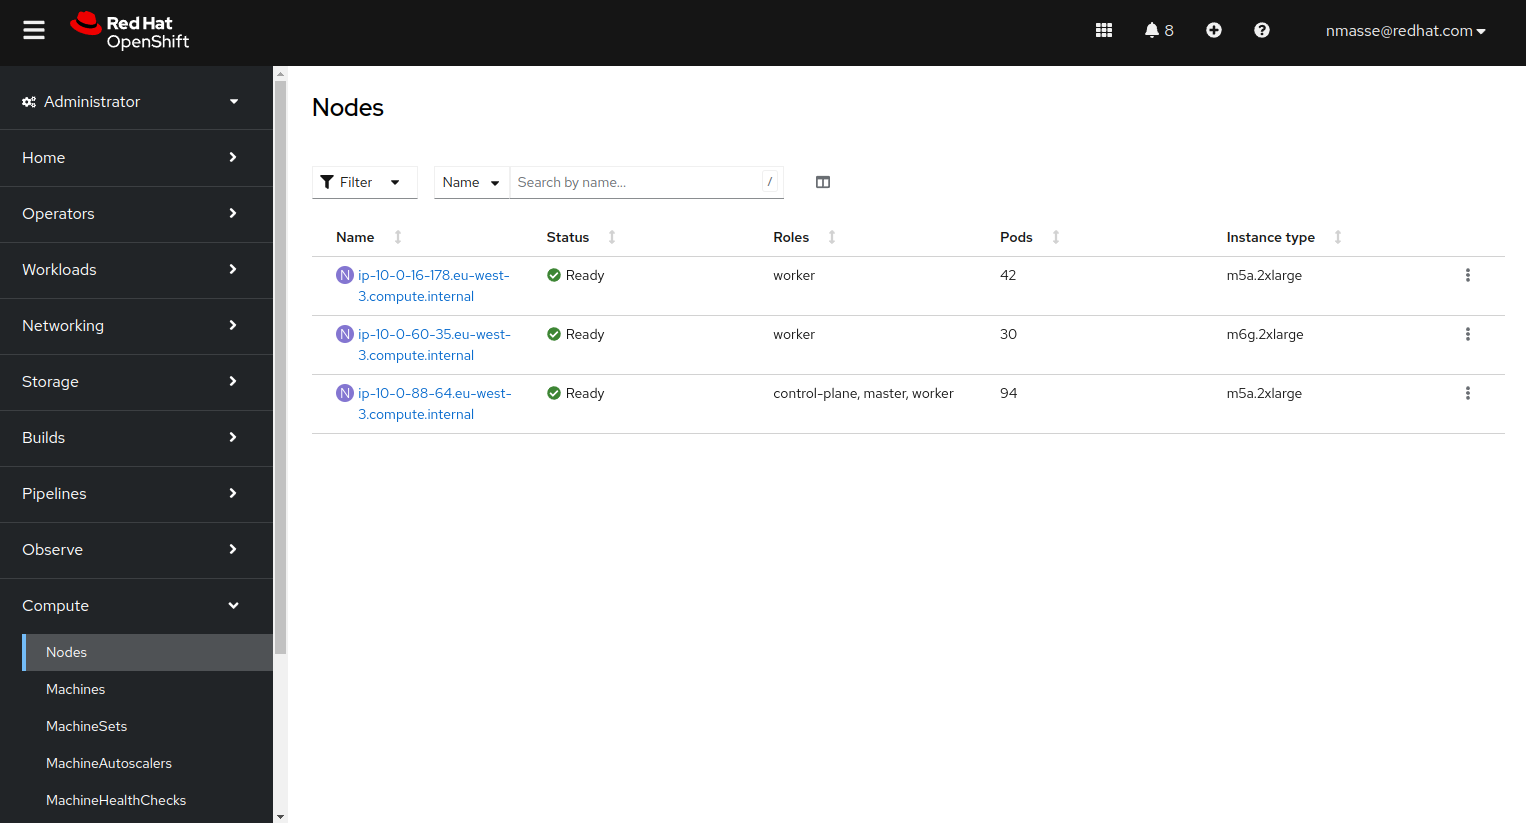
At this point, you should have three nodes in your cluster:
- 1 Control plane node x86_64
- 1 Compute node x86_64
- 1 Compute node arm64
Tekton operator installation
In the OpenShift platform, the Tekton operator is called OpenShift Pipelines Operator. The documentation explains how to install it.
In a nutshell, simply create the following CRD.
apiVersion: operators.coreos.com/v1alpha1
kind: Subscription
metadata:
  name: openshift-pipelines-operator
  namespace: openshift-operators
spec:
  channel: latest
  name: openshift-pipelines-operator-rh
  source: redhat-operators
  sourceNamespace: openshift-marketplace
Choosing a persistent storage technology
The Tekton pipelines that build container images need to store data that is used by multiple tasks.
For example, a task builds the x86_64 image while in parallel a task builds the arm64 image and a final task assembles these two images to form a manifest which will be pushed to the quay.io registry.
I had several storage technologies to choose from, each with their pros and cons. I chose to use AWS EFS but other technologies would have been possible.
- emptyDir storage. This is ephemeral storage, just for the lifetime of the Pod running the Tekton task. With this type of storage, I would have had to use the internal OpenShift registry to temporarily store the container images before pushing them to quay.io. That would have forced me to write large Tekton tasks (with lack of modularity).
- Block storage (AWS EBS). By using block storage, I cannot parallelize tasks that need access to the storage because access to block storage is exclusive: only one Pod can mount it at any time.
- Object type storage (AWS S3). Object type storage is well suited to storing images temporarily while waiting for them to be sent to the quay.io registry. The disadvantage I found is that you need a client in the container image (rclone, aws cli, etc.) and that would have added a copy step from/to S3 in my Tekton tasks.
I chose AWS EFS as persistent storage for Tekton pipelines but it doesn’t have only advantages.
In particular, the use of AWS EFS from Kubernetes can generate access rights problems with random (SCC restricted) or arbitrary (SCC anyuid) UIDs.
The article How to Solve AWS EFS “Operation Not Permitted” Errors in EKS is a good summary of the problem.
Initially, I naively tried to put the Buildah working directory (/var/lib/containers) on an AWS EFS volume. With this configuration, I noticed slowdowns and the access rights issues mentioned above.
To use AWS EFS with Tekton Pipelines, I chose a straight forward approach. Rather than putting the Buildah working directory on an AWS EFS volume, I chose to manually copy the image built by Buildah onto the EFS volume.
AWS EFS Storage
The OpenShift 4.15 documentation describes the installation of the AWS EFS CSI Driver Operator.
Install the AWS EFS CSI Driver Operator.
apiVersion: operators.coreos.com/v1alpha1
kind: Subscription
metadata:
  name: aws-efs-csi-driver-operator
  namespace: openshift-cluster-csi-drivers
spec:
  channel: stable
  installPlanApproval: Automatic
  name: aws-efs-csi-driver-operator
  source: redhat-operators
  sourceNamespace: openshift-marketplace
Install the AWS EFS CSI driver.
apiVersion: operator.openshift.io/v1
kind: ClusterCSIDriver
metadata:
    name: efs.csi.aws.com
spec:
  managementState: Managed
Create an EFS volume by following the steps in the AWS documentation.
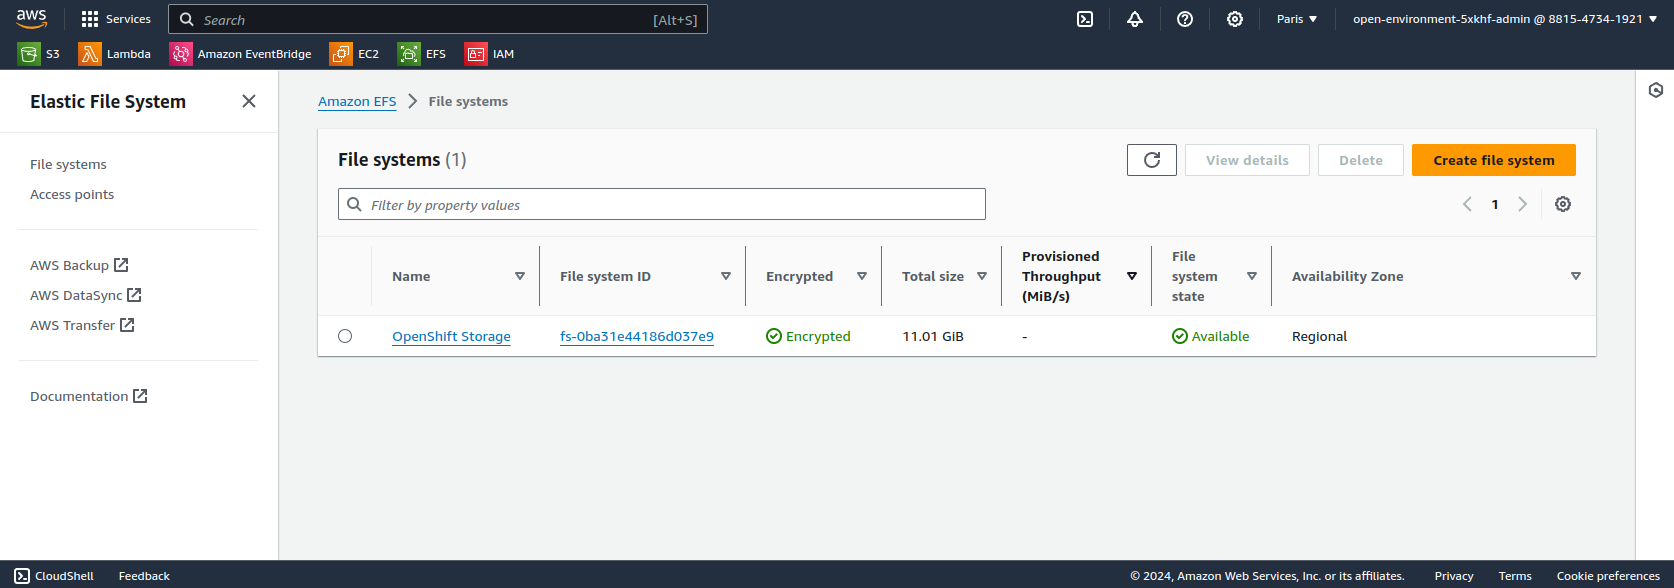
Create the StorageClass associated with the EFS volume.
The fileSystemId field matches to the second column in the screenshot above.
The uid and gid fields set to 0 ensure that Pods running as root will not see inconsistencies between their uid (0) and the one of the EFS volume (0 too).
kind: StorageClass
apiVersion: storage.k8s.io/v1
metadata:
  name: efs-csi
provisioner: efs.csi.aws.com
parameters:
  provisioningMode: efs-ap
  fileSystemId: fs-0ba31e44186d037e9
  directoryPerms: "700"
  basePath: "/pv"
  uid: "0"
  gid: "0"
Following the documentation OpenShift 4.15, modify the EFS Security Group to allow OpenShift nodes to access storage via the NFS protocol.
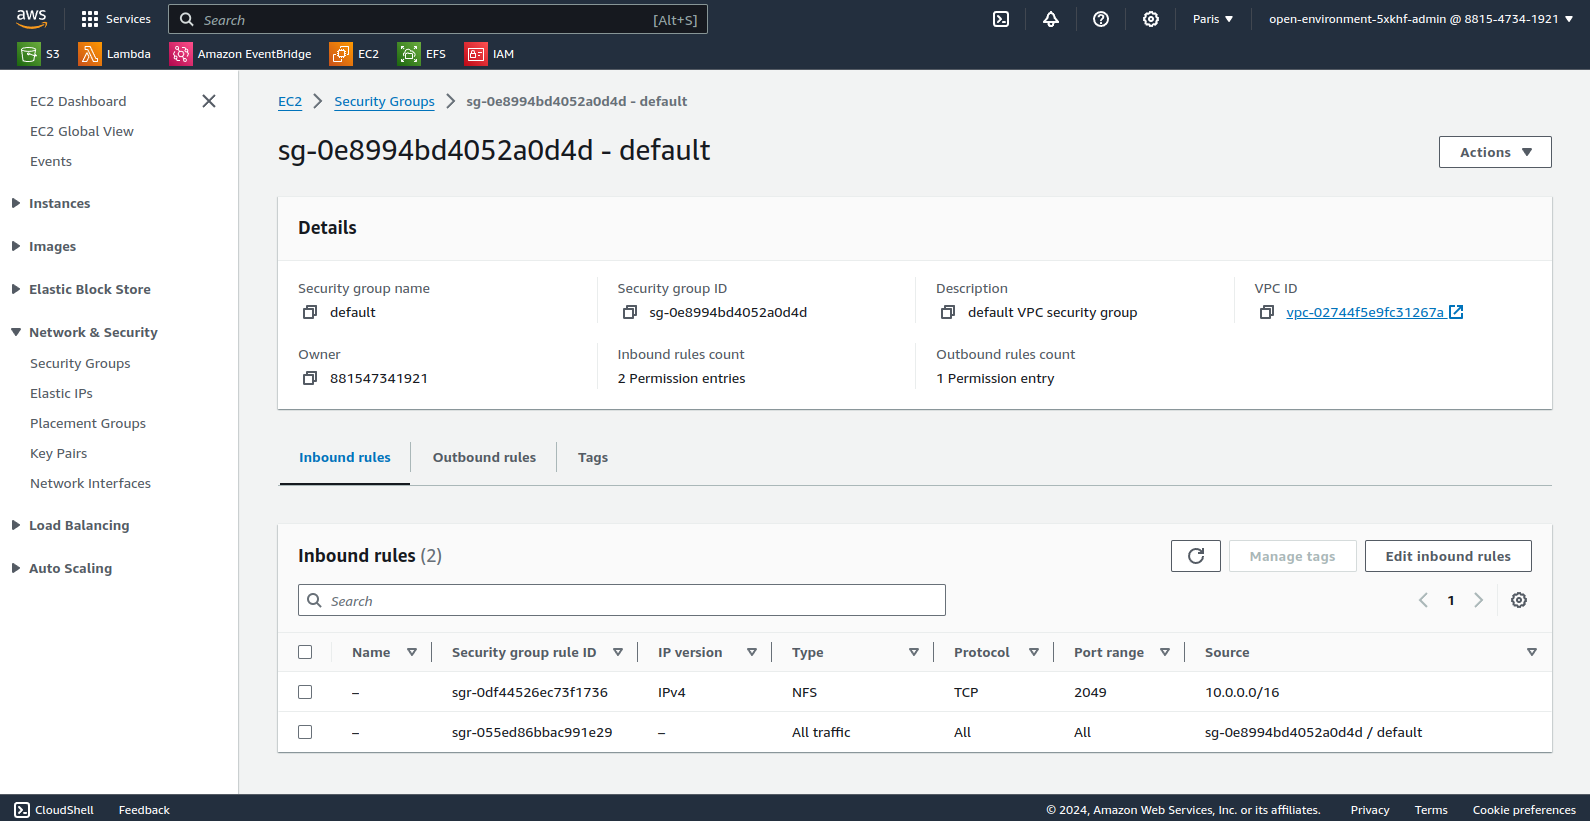
At this point, the AWS EFS service is accessible from the OpenShift cluster but is not yet usable by Tekton pipelines. Indeed, Tekton’s affinity-assistant prohibits an RWX persistent volume from being mounted in two places at the same time (error “more than one PersistentVolumeClaim is bound”).
Disable affinity-assistant in Tekton configuration.
oc patch configmap/feature-flags -n openshift-pipelines --type=merge -p '{"data":{"disable-affinity-assistant":"true"}}'
Tekton multi-architecture pipelines
In this section, I briefly give the instructions required for deploying the example pipelines and then I detail the specifics of each pipeline.
Create an OpenShift project.
oc new-project build-multiarch
Create the Secret containing your quay.io login and password.
oc create secret docker-registry quay-authentication --docker-email=nmasse@redhat.com --docker-username=nmasse --docker-password=REDACTED --docker-server=quay.io
oc annotate secret/quay-authentication tekton.dev/docker-0=https://quay.io
Clone the tekton-pipeline-multiarch Git repository.
git clone https://github.com/nmasse-itix/tekton-pipeline-multiarch
cd tekton-pipeline-multiarch
Deploy the Tekton pipelines.
oc apply -k tekton/
for yaml in examples/*/tekton/pipeline.yaml; do oc apply -f $yaml; done
Start the Tekton pipelines.
for yaml in examples/*/tekton/pipelinerun.yaml; do oc create -f $yaml; done
Tekton tasks
The buildah-build task builds a container image using the buildah command. The specifics of this task are related to the prerequisites necessary for running buildah in a container.
- The buildah working directory (/var/lib/containers) is an emptyDir volume.
- The
STORAGE_DRIVER=vfsenvironment variable disables the use of overlayfs. - Finally, the capability SETFCAP is assigned to buildah.
apiVersion: tekton.dev/v1beta1
kind: Task
metadata:
  name: buildah-build
spec:
  params:
  - name: context-dir
    type: string
    default: .
  - name: containerfile-path
    type: string
    default: Containerfile
  workspaces:
  - name: source-workspace
    description: Workspace containing source code
  - name: oci-images
    mountPath: /srv/oci-images
  volumes:
  - name: container-storage
    emptyDir: {}
  steps:
  - name: build
    image: registry.redhat.io/rhel8/buildah:8.9
    env:
    - name: STORAGE_DRIVER
      value: vfs
    script: |
      #!/bin/bash
      set -Eeuo pipefail
      buildah bud -t localhost/image:$(uname -m) -f $(workspaces.source-workspace.path)/$(params.containerfile-path) $(workspaces.source-workspace.path)/$(params.context-dir)
      buildah push localhost/image:$(uname -m) oci-archive:/srv/oci-images/$(uname -m).tar
    securityContext:
      capabilities:
        add:
          - SETFCAP
    volumeMounts:
    - name: container-storage
      mountPath: /var/lib/containers
The script executed by this task is concise (only two steps):
- It builds the container image from a Dockerfile / Containerfile.
buildah bud -t localhost/image:$(uname -m) -f $(workspaces.source-workspace.path)/$(params.containerfile-path) $(workspaces.source-workspace.path)/$(params.context-dir) - It stores a copy of the container image in the AWS EFS volume in OCI format.
The
buildah push localhost/image:$(uname -m) oci-archive:/srv/oci-images/$(uname -m).tarbuildah pushcommand could mislead us to believe that we are pushing the image into a remote registry. But since the destination image is prefixed withoci-archive:, buildah actually pushes the image onto the file system (in OCI format).
The buildah-push task retrieves from the AWS EFS volume the images generated by the multiple instances of buildah-build, assembles them to form a multi-architecture manifest and pushes everything to the registry.
The specifics of this task are mostly the same as for buildah-build. Only an additional workspace named “dockerconfig” has been added to pass the credentials to access the registry.
But let’s focus on its script.
#!/bin/bash
set -Eeuo pipefail

# Handle registry credentials
if [[ "$(workspaces.dockerconfig.bound)" == "true" ]]; then
  if test -f "$(workspaces.dockerconfig.path)/config.json"; then
    export DOCKER_CONFIG="$(workspaces.dockerconfig.path)"
  elif test -f "$(workspaces.dockerconfig.path)/.dockerconfigjson"; then
    cp "$(workspaces.dockerconfig.path)/.dockerconfigjson" "$HOME/.docker/config.json"
    export DOCKER_CONFIG="$HOME/.docker"
  else
    echo "neither 'config.json' nor '.dockerconfigjson' found at workspace root"
    exit 1
  fi
fi

declare -a iids=()
for arch; do
  echo "Loading image for architecture $arch..."
  iid=$(buildah pull oci-archive:/srv/oci-images/$arch.tar)
  iids+=("$iid")
done
buildah manifest create localhost/multi-arch-image "${iids[@]}"
buildah manifest push --all localhost/multi-arch-image docker://$(params.image-name)
The first part of the script sets the variable DOCKER_CONFIG which is then used by the buildah push command to authenticate to the registry.
The second part retrieves the images of the different architectures (buildah pull command) and stores their Image ID in a list.
The buildah manifest create command creates a multi-architecture manifest with the list of all previously loaded images.
Finally, the buildah manifest push command sends the manifest and images to the registry.
The “Containerfile” pipeline
The first use case presented at the beginning of this article is about the use of a Dockerfile / Containerfile to build a container image:
Building an image from a Dockerfile / Containerfile. A multi-architecture base image is available in a registry and the Dockerfile / Containerfile applies a series of modifications to this image. The resulting image is also multi-architecture.
The corresponding pipeline fetches the source code, executes a buildah build for each architecture (x86_64 and arm64) and pushes the manifest to the registry.
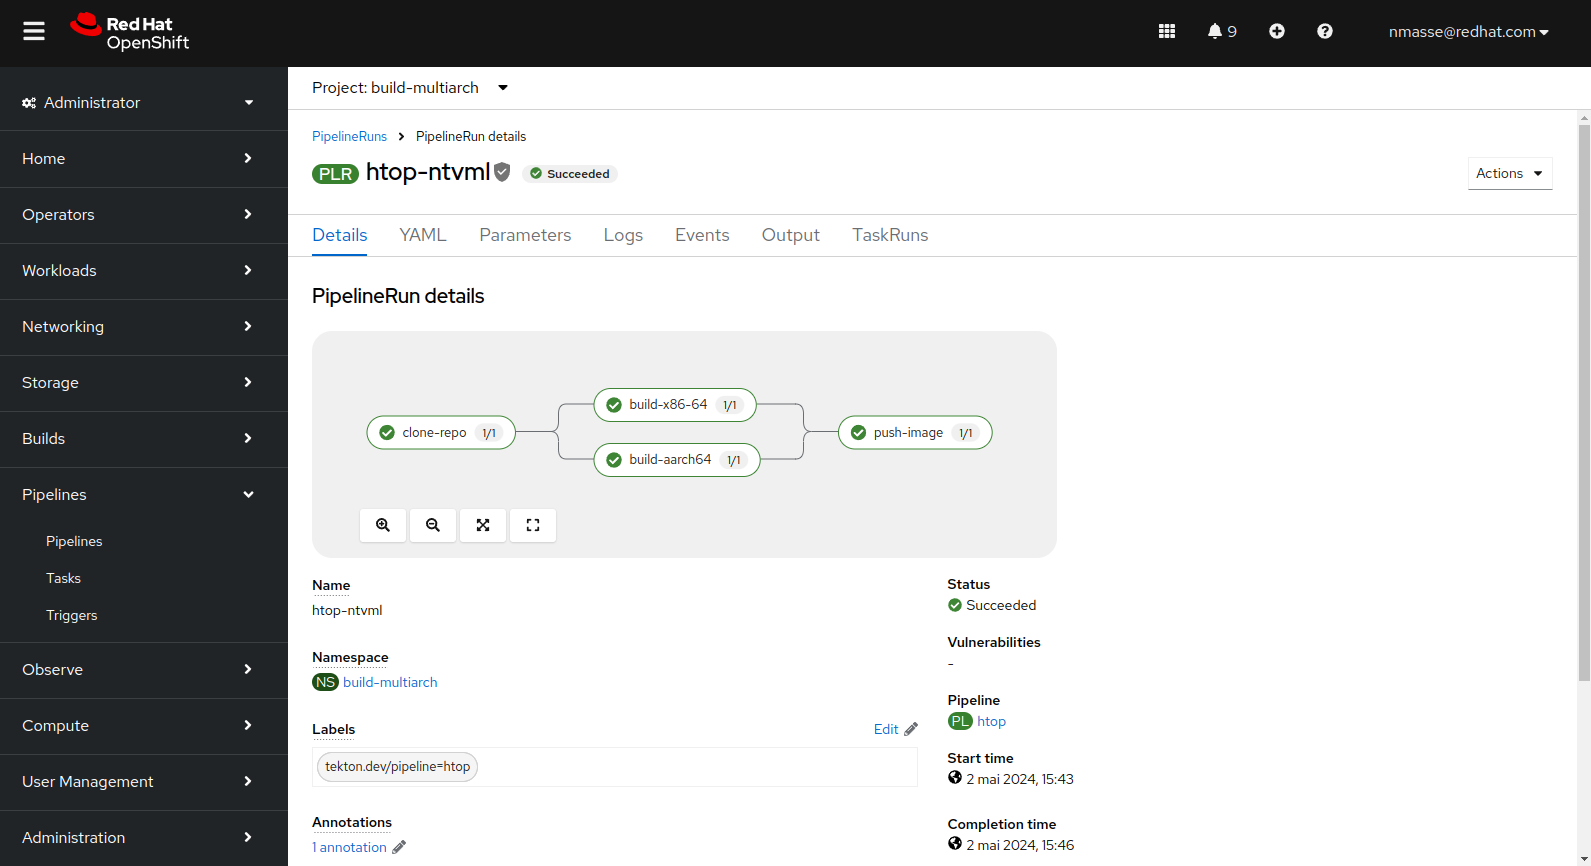
htop utility).The resulting image on the quay.io registry clearly shows a manifest containing two images: one for x86_64 and one for arm64.
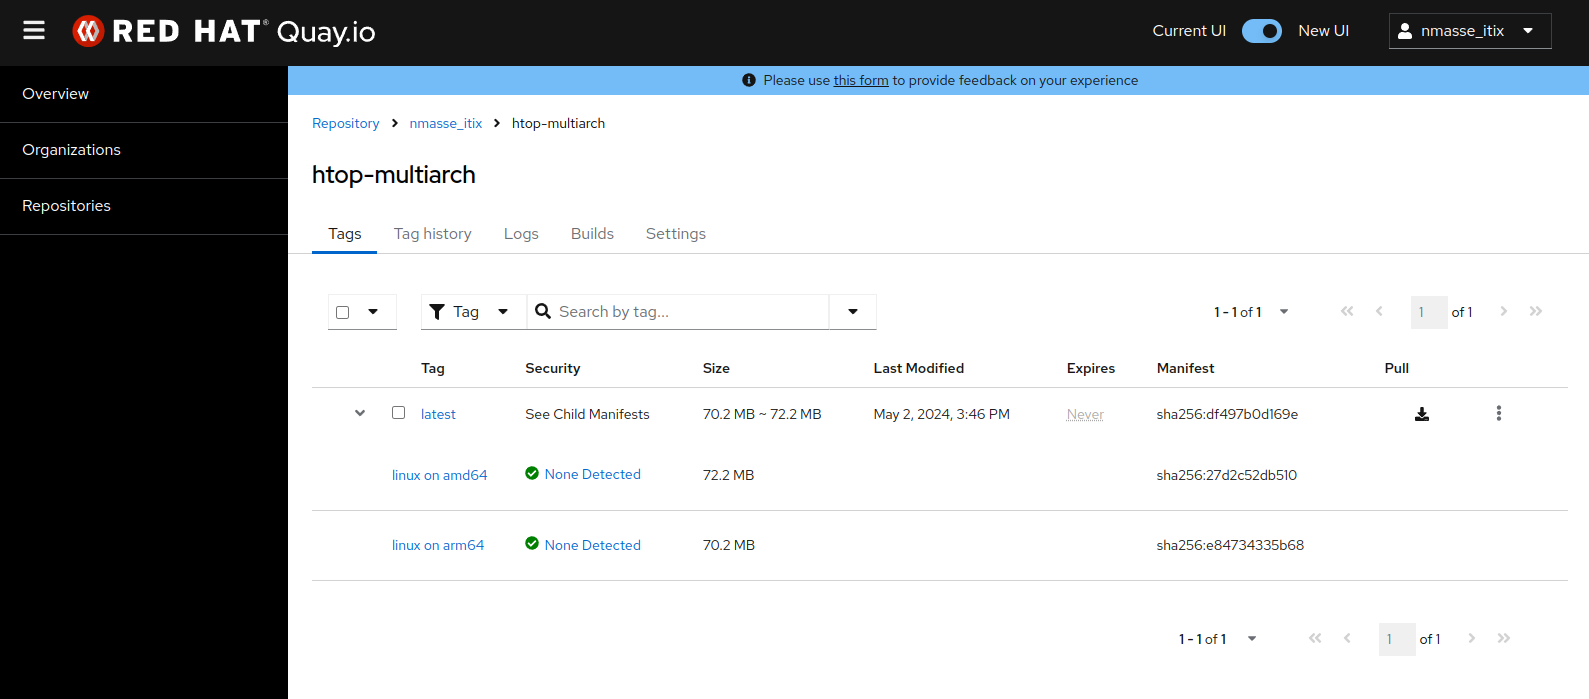
htop utility).The “NodeJS” pipeline
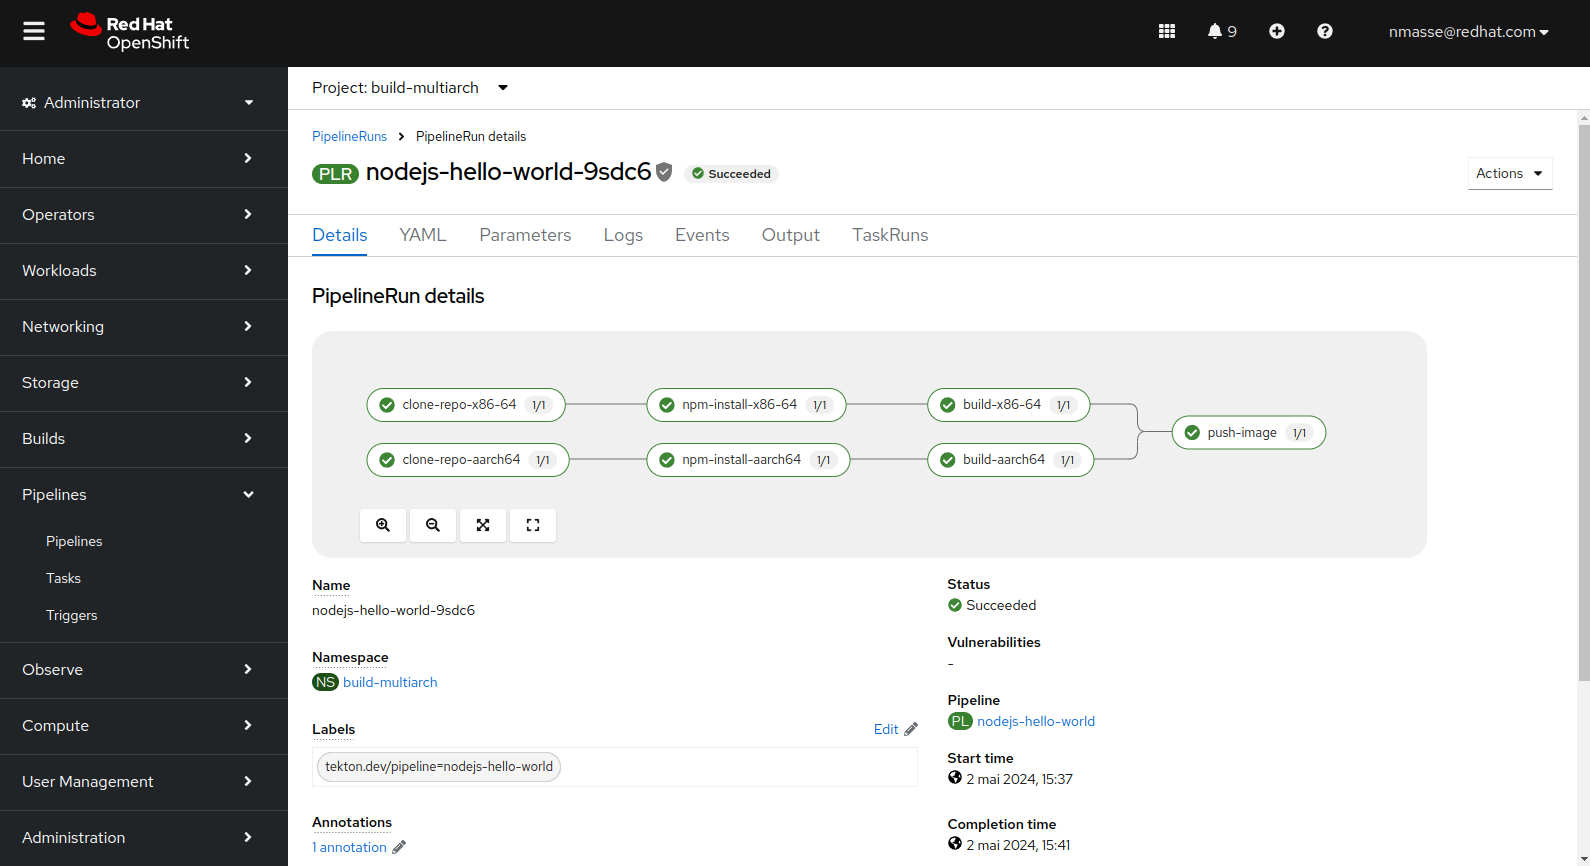
The NodeJS pipeline is significantly different in that the Git repository is fetched twice: once for each architecture.
The reason is that the npm install command will download the application dependencies and some of these dependencies can embed native code (this is the case for some low-level libraries). Therefore, we need a separate workspace for each architecture.
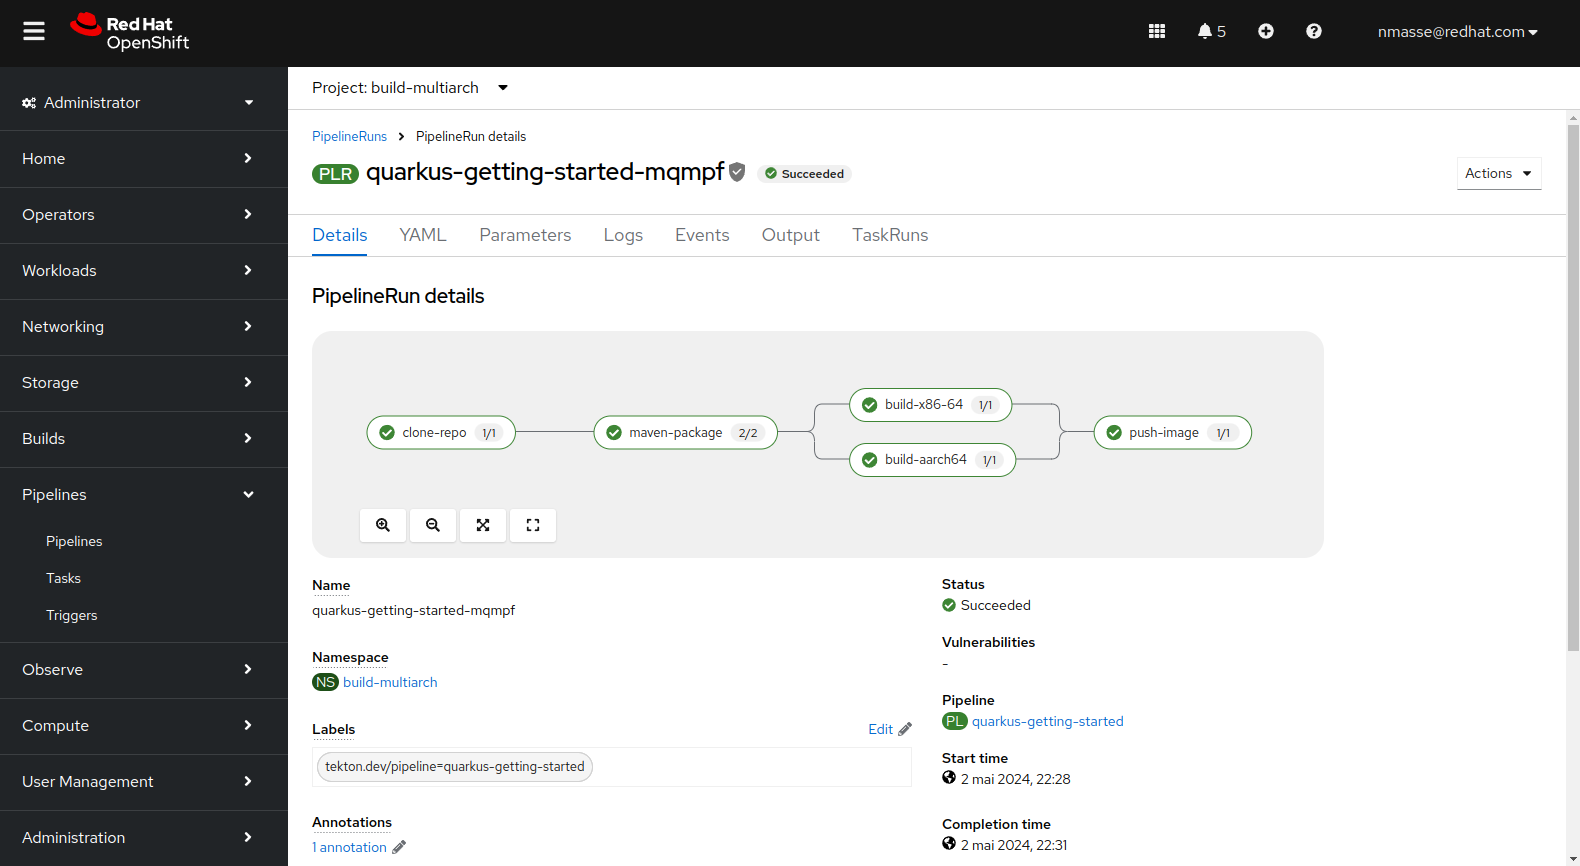
The “Quarkus” Pipeline
The Quarkus pipeline is different from the NodeJS pipeline in the sense that the Quarkus application is compiled in JVM mode and therefore the compilation only takes place once. The bytecode contained in Jar files can run on any architecture. Therefore there is only one Git workspace shared between all architectures.
Link a task to an architecture
So far the article does not say how Tekton organizes itself to execute the task of building the image x86_64 on an x86_64 node, the image arm64 on an arm64 node, etc.
There is no magic! It’s all happening in the PipelineRun!
apiVersion: tekton.dev/v1
kind: PipelineRun
metadata:
  generateName: htop-
spec:
  pipelineRef:
    name: htop
  params:
  - name: git-url
    value: https://github.com/nmasse-itix/tekton-pipeline-multiarch.git
  - name: image-name
    value: quay.io/nmasse_itix/htop-multiarch
  - name: context-dir
    value: examples/htop/src
  - name: containerfile-path
    value: "examples/htop/src/Containerfile"
  workspaces:
  - name: oci-images
    volumeClaimTemplate:
      spec:
        storageClassName: efs-csi
        accessModes:
        - ReadWriteMany
        resources:
          requests:
            storage: 10Gi
  - name: source-workspace
    volumeClaimTemplate:
      spec:
        storageClassName: efs-csi
        accessModes:
        - ReadWriteMany
        resources:
          requests:
            storage: 1Gi
  - name: registry-token
    secret:
      secretName: quay-authentication
  taskRunTemplate:
    serviceAccountName: buildbot
  taskRunSpecs:
  - pipelineTaskName: build-x86-64
    podTemplate:
      nodeSelector:
        beta.kubernetes.io/arch: amd64
  - pipelineTaskName: build-aarch64
    podTemplate:
      nodeSelector:
        beta.kubernetes.io/arch: arm64
The taskRunSpecs field allows you to add execution constraints to one or more pipeline tasks.
In the example above, the PipelineRun forces the execution of the task build-x86-64 on a node with the label beta.kubernetes.io/arch=amd64 and the task build-aarch64 on a node with the label beta.kubernetes.io/arch=arm64.
Conclusion
In this article, we reviewed the setup needed to build multi-architecture images in an OpenShift environment in the AWS Cloud. Three use cases were implemented: building an image from a Dockerfile / Containerfile, building a NodeJS application and finally building a Quarkus application.
The source code and manifests are present in the Git repository for those who want to reproduce the experience.